
There’s nothing like the smell of BBQ chicken drumsticks sizzling on the grill on a warm summer evening. The crackling sound, the sweet and smoky aroma—it’s pure backyard magic. And I’ll let you in on a little secret: this BBQ grilled chicken drumsticks recipe is so simple, even my 10-year-old nephew can nail it (though I still supervise the flipping!).
Every summer, this recipe becomes my go-to for family cookouts. No fuss, just juicy, fall-off-the-bone chicken with that perfect sticky glaze. Whether it’s a last-minute weeknight dinner or a big weekend gathering, these drumsticks never disappoint. I’ve lost count of how many times friends have asked for the recipe—so here it is, my tried-and-true method for BBQ chicken that’s always a hit!
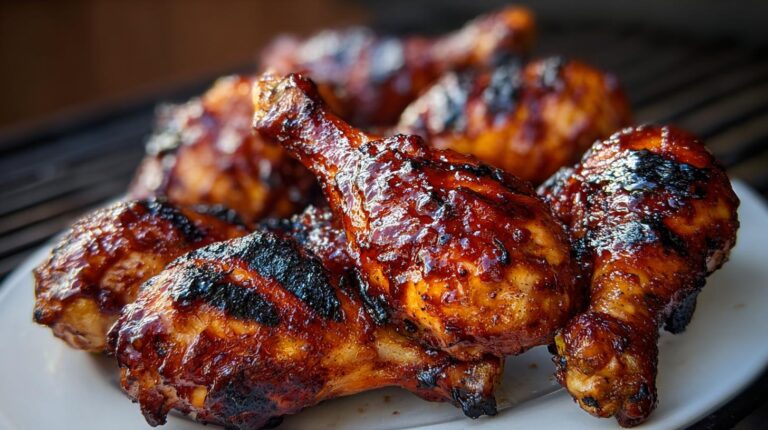
What makes this recipe special? It’s all about the balance—enough seasoning to give it depth, but not so much that it overpowers the natural flavor of the chicken. And that honey-kissed BBQ sauce? Pure gold. Just wait until you see how it caramelizes into the most mouthwatering crust.
Why You’ll Love These BBQ Grilled Chicken Drumsticks
Listen, I know we all have those go-to recipes that never let us down—the ones we pull out when we need a guaranteed win. Well, these BBQ grilled chicken drumsticks? They’re officially joining that hall of fame. Here’s why:
1. They’re ridiculously easy – No fancy techniques here! Just toss the drumsticks with spices, throw them on the grill, and let the magic happen. Even if you’ve never grilled before, you’ve got this.
2. That juicy, tender texture – The combo of olive oil and proper grilling time keeps every bite moist. No dry chicken allowed at my cookouts!
3. Bold flavor without the fuss – That spice blend? It’s my secret weapon. Just enough kick to make things interesting, but not so much that the kids won’t eat it (trust me, I’ve tested this on picky eaters).
4. The ultimate crowd-pleaser – I can’t tell you how many times I’ve seen people go back for thirds at parties. There’s something about finger-licking BBQ chicken that brings everyone together.
5. Summer in every bite – That smoky char, the sticky-sweet glaze… one taste and you’ll be transported to every perfect backyard BBQ memory you’ve ever had.
Honestly? The hardest part is waiting for them to finish grilling while that amazing smell taunts you. But hey, good things come to those who wait—and these drumsticks are worth every second.
Ingredients for BBQ Grilled Chicken Drumsticks
Okay, let’s talk ingredients – but first, a confession: I used to think all BBQ chicken recipes were basically the same. Then I learned that the little details make ALL the difference. Here’s exactly what you’ll need for drumsticks that’ll have everyone begging for seconds:
The Chicken:
- 8 chicken drumsticks (skin-on, please – that’s where all the flavor lives!)
The Seasoning Squad:
- 2 tablespoons olive oil (the good stuff that makes everything stick)
- 1 teaspoon salt (I use kosher – it distributes better)
- 1 teaspoon black pepper (freshly cracked if you can)
- 1 teaspoon garlic powder (trust me, granulated garlic burns less than fresh)
- 1 teaspoon onion powder (that subtle sweetness is key)
- 1 teaspoon smoked paprika (this is what gives that “backyard BBQ” vibe)
- 1/2 teaspoon chili powder (just enough warmth without being spicy)
The Glorious Glaze:
- 1 cup BBQ sauce (your favorite brand – I’m partial to Sweet Baby Ray’s)
- 1 tablespoon honey (maple syrup works too if you’re out)
A quick note about substitutions: Don’t have honey? No sweat – brown sugar works beautifully (use 2 tablespoons). Out of smoked paprika? Regular paprika plus a tiny pinch of cumin gets you close. The olive oil can swap for vegetable oil in a pinch, but olive oil gives that extra richness I love.
See? Nothing fancy – just pantry staples that come together in the most magical way. Now let’s get these bad boys on the grill!
How to Make BBQ Grilled Chicken Drumsticks
Alright, let’s get down to business! I promise this process is easier than you think – I’ve made these drumsticks so many times I could probably do it in my sleep (though I don’t recommend trying that). Follow these steps, and you’ll have chicken that’ll make your neighbors peek over the fence to see what smells so good.
Step 1: Prep the Chicken and Seasoning
First things first – grab those drumsticks and pat them dry with paper towels. I know it seems like a small step, but trust me, dry chicken means crispy skin! Throw them in a big bowl (I use my favorite battered mixing bowl that’s seen more BBQs than I can count).
Now for the fun part – drizzle that olive oil all over them like you’re painting a masterpiece. Then comes the spice parade: salt, pepper, garlic powder, onion powder, smoked paprika, and chili powder. Get your hands in there and massage those spices in like you’re giving the chicken a spa treatment – every inch should be coated. Let them sit for about 10 minutes while you fire up the grill (this lets the flavors really get cozy).
Step 2: Grill to Perfection
While your chicken is getting acquainted with the spices, preheat your grill to medium heat. Don’t skip oiling those grates! I use tongs and a folded paper towel dipped in oil – just rub it across the grates until they shine. This little trick saves you from the dreaded chicken-sticking disaster.
Now arrange those drumsticks on the grill like they’re sitting around a campfire. Close the lid and let them cook for about 5-7 minutes before flipping. You’re looking for those beautiful grill marks and a bit of char – that’s where the magic happens! Keep flipping every 5-7 minutes (I set a timer so I don’t forget) for about 25-30 minutes total. The chicken should be nearly cooked through before we add the sauce – we’re aiming for about 160°F at this point.
Step 3: Glaze with BBQ Sauce
While the chicken works its magic, mix your BBQ sauce and honey in a small bowl. This combo is my secret weapon – the honey helps the sauce caramelize into that sticky, finger-licking goodness we all crave.
When there’s about 5-8 minutes left of cooking time, start brushing on that sauce. Use a silicone brush (trust me, they’re easier to clean than the bristle ones) and coat each drumstick generously. Flip and sauce every couple minutes until you’ve built up that gorgeous glaze. The sauce should be bubbling and slightly charred at the edges – that’s when you know it’s perfect!
Pull them off when they hit 165°F internally (yes, a meat thermometer is your best friend here) and let them rest for 5 minutes. I know it’s torture to wait, but this lets the juices redistribute so every bite is as juicy as can be. Then dig in and prepare for compliments!
Tips for the Best BBQ Grilled Chicken Drumsticks
After making these drumsticks more times than I can count (and surviving a few early disasters), I’ve learned some tricks that make all the difference between good chicken and knock-your-socks-off chicken. Here are my hard-earned lessons:
1. Thermometer is non-negotiable – I used to think I could eyeball doneness. Nope! That one time I served slightly pink chicken still haunts me. Now my instant-read thermometer stays clipped to my apron. Pull the drumsticks at 165°F in the thickest part (not touching bone) for perfect safety and juiciness every time.
2. Let them rest like a napping toddler – I know it’s tempting to dive right in, but those 5 minutes of resting time? Crucial. I set a timer because otherwise I’ll cheat. The juices need time to settle back into the meat instead of running all over your plate. Cover loosely with foil to keep warm.
3. Sauce thickness matters – Too thin and it drips off; too thick and it burns. My golden ratio: 1 cup BBQ sauce + 1 tablespoon honey. If your sauce seems thick straight from the bottle, warm it slightly with the honey to thin it just enough to brush easily. Test a small dab on one drumstick first – it should cling nicely without running.
4. Control your heat like a DJ – Medium heat is your sweet spot. Too high and the sugars burn before the chicken cooks through (been there, served charcoal). Too low and you’ll never get that beautiful caramelization. If flare-ups happen, move the drumsticks to a cooler part of the grill temporarily. My grill has hot spots, so I rotate the chicken’s position every time I flip.
Bonus tip from my last cookout disaster: Keep a spray bottle of water nearby for flare-ups, and don’t sauce too early! That sticky-sweet coating needs just those last few minutes to transform into magic without turning into a blackened mess. Trust me, your future self will thank you.
Serving Suggestions
Now that you’ve got these gorgeous BBQ grilled chicken drumsticks ready, let’s talk about what to serve with them! I’ve hosted enough backyard BBQs to know that the right sides can turn a good meal into an unforgettable feast. Here are my go-to pairings that always disappear faster than the chicken:
Cornbread that’ll make you swoon – There’s something magical about tearing into warm, buttery cornbread alongside sticky BBQ chicken. My grandma’s cast iron skillet version is perfect for soaking up any extra sauce. Bonus points if you throw some jalapeños in the batter for a little kick!
Creamy coleslaw that crunches – That cool, crisp contrast is everything against the smoky chicken. I make mine with purple cabbage for color and a touch of apple cider vinegar for tang. Pro tip: Let it chill for at least an hour before serving so the flavors really marry.
Grilled veggies with attitude – While the grill’s hot, throw on some zucchini, bell peppers, or corn (husks and all!). A quick brush of olive oil and sprinkle of salt transforms them into the perfect smoky side. My kids actually fight over the charred bits – who knew?
Baked beans that mean business – No backyard BBQ is complete without them! I doctor up canned beans with extra brown sugar, mustard, and a splash of bourbon if I’m feeling fancy. Let them simmer while the chicken grills for maximum flavor.
Simple summer salads – When it’s blazing hot outside, I lean into fresh tomatoes with basil or a watermelon-feta-mint situation. The brightness cuts through the richness of the chicken beautifully.
And here’s my secret weapon: garlic butter rolls warm from the oven. Nothing fancy – just frozen dinner rolls brushed with melted butter and garlic powder, then baked until golden. They’re perfect for mopping up every last bit of that amazing BBQ sauce.
Remember – this isn’t about fancy presentation. Pile everything on checkered paper plates, set out a roll of paper towels (because things will get messy), and let everyone dig in family-style. That’s when the real magic happens!
Storage and Reheating
Okay, let’s be real – leftovers from this BBQ grilled chicken drumsticks recipe are rare in my house (my husband has been known to sneak extra helpings when he thinks I’m not looking). But on the off chance you’ve got some survivors, here’s how to keep them tasting amazing:
Storing them right – Let the drumsticks cool completely before packing them up (hot chicken in a container = soggy skin sadness). I use an airtight container with parchment paper between layers if stacking. They’ll keep beautifully in the fridge for 3-4 days – any longer and the quality starts to suffer.
Freezing for future cravings – Wrap each drumstick individually in foil, then pop them in a freezer bag. They’ll stay good for about 2 months. Thaw overnight in the fridge when the BBQ craving strikes again!
Reheating like a pro – The microwave is the enemy of crispy chicken skin. Instead, I reheat mine in a 350°F oven for about 15 minutes (place them on a rack so they crisp evenly). Even better? Throw them back on the grill for a few minutes per side – it brings back that fresh-off-the-grill magic!
Little trick I learned from my mom: Brush on a tiny bit of fresh BBQ sauce when reheating to revive that sticky-sweet glaze. Just don’t overdo it or the sugar can burn. And whatever you do, don’t skip reheating them properly – cold BBQ chicken just isn’t the same!
Nutritional Information
Now, I’m no nutritionist, but I know folks like to have an idea of what they’re eating – especially when you’re going back for thirds like I always do! Here’s the breakdown for these BBQ grilled chicken drumsticks, but keep in mind these are estimates that can vary based on your specific ingredients and brands.
Per serving (that’s 2 drumsticks, because let’s be honest – who stops at one?):
- 390 calories
- 29g protein (hello, muscle fuel!)
- 18g fat (4g saturated)
- 25g carbohydrates
- 18g sugar (mostly from that glorious BBQ sauce)
- 850mg sodium
- 130mg cholesterol
- 1g fiber
A little tip from my fitness-obsessed sister: If you’re watching your sugar intake, you can reduce it by using a sugar-free BBQ sauce (though I’ll admit I prefer the real deal). And if sodium’s a concern, just go lighter on the initial salt seasoning – the BBQ sauce packs plenty of flavor on its own.
Honestly? I don’t stress too much about the numbers when it comes to this recipe. Everything in moderation, right? And when chicken tastes this good, I say it’s worth every delicious bite!
FAQs About BBQ Grilled Chicken Drumsticks
Over the years, I’ve gotten so many questions about this backyard BBQ chicken recipe – and I love sharing what I’ve learned through trial and error (mostly error at first!). Here are the answers to the questions I hear most often:
Can I bake these drumsticks instead of grilling?
Absolutely! While you’ll miss that smoky char, baking works in a pinch. Preheat your oven to 400°F, place the drumsticks on a rack over a baking sheet, and bake for about 35-40 minutes, brushing with the BBQ sauce during the last 10 minutes. Just keep an eye on them – ovens can vary wildly!
How do I prevent the BBQ sauce from burning?
Oh boy, I learned this the hard way – burnt sauce is no joke! The key is waiting until the last 5-8 minutes to add the sauce. Also, make sure your grill isn’t too hot (medium is perfect), and keep flipping those drumsticks every couple minutes once sauced. If you see blackening, move them to a cooler part of the grill temporarily.
What’s the best BBQ sauce brand to use?
I’m partial to Sweet Baby Ray’s for its perfect balance of sweet and tangy, but honestly? Use whatever sauce makes your taste buds happy! Some folks swear by Stubb’s for its smoky depth, while others prefer the sweetness of Kraft. My advice? Taste a few brands and pick your favorite – it’s all about personal preference.
Can I use boneless chicken thighs instead?
You sure can! Thighs are actually harder to dry out, so they’re very forgiving. Just adjust the cooking time – they’ll need about 6-8 minutes per side over medium heat. The skin gets extra crispy, which I absolutely love. Same rules apply with the sauce timing!
How do I know when the drumsticks are done without cutting into them?
This was my biggest struggle when I first started grilling! Invest in an instant-read thermometer – it’s a game changer. The thickest part of the drumstick (not touching bone) should read 165°F. If you don’t have one, look for clear juices running out when pierced and meat that’s pulling away from the bone slightly.
Remember – no question is too silly! I’ve made every mistake in the book with this recipe, so if you’re wondering about something, chances are I’ve been there. Happy grilling!
Tell Us How It Went!
Nothing makes me happier than hearing how this BBQ grilled chicken drumsticks recipe turned out for you! Did your family go crazy for them like mine always does? Maybe you put your own spin on the spice blend or discovered the perfect BBQ sauce pairing? I want to hear all about it!
Leave a comment below and tell me – did the drumsticks get that perfect sticky char? Did your guests beg for the recipe like mine do? Or if you ran into any hiccups, let me know so I can help troubleshoot for next time. Your feedback helps make this recipe even better!
And hey – if you snapped a photo of your gorgeous grilled chicken (I know it was Instagram-worthy), tag me @GrillMasterJen so I can see your handiwork! There’s nothing more satisfying than seeing everyone’s delicious variations of this backyard classic. Now go enjoy those compliments – you’ve earned them!
PrintJuicy BBQ Grilled Chicken Drumsticks in 30 Minutes
A simple and flavorful BBQ grilled chicken drumsticks recipe, perfect for backyard BBQs and summer dinners.
- Prep Time: 10 minutes
- Cook Time: 30 minutes
- Total Time: 40 minutes
- Yield: 4 servings 1x
- Category: Main Course
- Method: Grilling
- Cuisine: American
- Diet: Low Lactose
Ingredients
- 8 chicken drumsticks
- 2 tablespoons olive oil
- 1 teaspoon salt
- 1 teaspoon black pepper
- 1 teaspoon garlic powder
- 1 teaspoon onion powder
- 1 teaspoon smoked paprika
- 1/2 teaspoon chili powder
- 1 cup BBQ sauce
- 1 tablespoon honey
Instructions
- Preheat the grill to medium heat and lightly oil the grates.
- Pat the chicken drumsticks dry and place them in a large bowl.
- Drizzle with olive oil, then season with salt, black pepper, garlic powder, onion powder, smoked paprika, and chili powder. Toss well to coat.
- Grill the drumsticks for 25 to 30 minutes, turning every 5 to 7 minutes, until the chicken is nearly cooked through and has a nice char on the outside.
- In a small bowl, mix the BBQ sauce with honey.
- Brush the drumsticks generously with the BBQ sauce mixture during the last 5 to 8 minutes of grilling, turning and brushing a few times until sticky and caramelized.
- Remove from the grill once the internal temperature reaches 165°F. Let rest for 5 minutes before serving.
Notes
- Use a meat thermometer to ensure the chicken reaches 165°F internally.
- Resting the chicken before serving keeps it juicy.
- Adjust the seasoning to your taste.
Nutrition
- Serving Size: 2 drumsticks
- Calories: 390
- Sugar: 18g
- Sodium: 850mg
- Fat: 18g
- Saturated Fat: 4g
- Unsaturated Fat: 10g
- Trans Fat: 0g
- Carbohydrates: 25g
- Fiber: 1g
- Protein: 29g
- Cholesterol: 130mg
Keywords: bbq grilled chicken drumsticks, bbq chicken drumsticks recipe, easy grilled chicken recipe, juicy chicken drumsticks, backyard bbq chicken, summer chicken dinner