
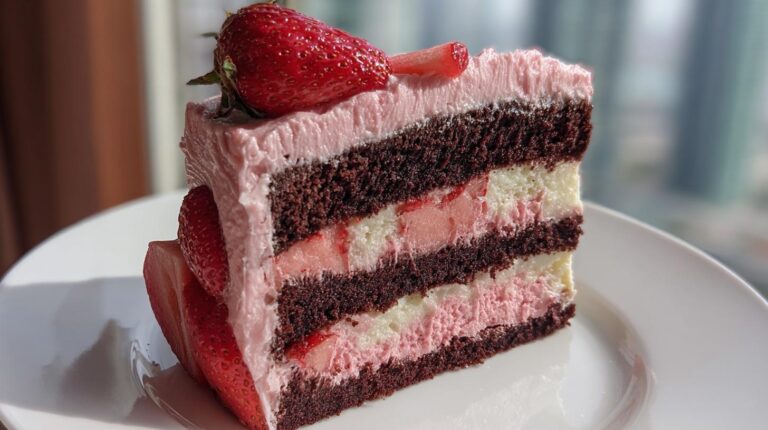
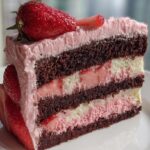
Oh my gosh, let me tell you about the first time I made this chocolate vanilla strawberry layer cake for my niece’s birthday! I wanted something extra special – something that would make her eyes light up when she saw it. When I pulled this beauty out of the fridge with its gorgeous pink frosting peeking between those rich chocolate and vanilla layers, everyone at the party gasped. The best part? That first bite where the sweet strawberries meet the deep chocolate and light vanilla – absolute perfection. This cake isn’t just dessert, it’s a showstopper that tastes even better than it looks.
Why You’ll Love This Chocolate Vanilla Strawberry Layer Cake
Trust me, this cake is going to be your new go-to for every celebration (or just because it’s Tuesday). Here’s why:
- Flavor fireworks: That perfect balance of rich chocolate, sweet vanilla, and fresh strawberries will make your taste buds dance.
- Looks like a bakery masterpiece: The pink frosting peeking between those gorgeous layers? Total Instagram-worthy moment.
- Surprisingly easy: Don’t let the fancy look fool you – I promise it’s simpler than it appears!
- Crowd-pleaser: Works for birthdays, anniversaries, or when you need to impress your mother-in-law.
- Fresh strawberry magic: None of that artificial stuff here – just real fruit flavor shining through.
Ingredients for Chocolate Vanilla Strawberry Layer Cake
Okay, let’s talk ingredients – and I mean the good stuff! This cake deserves quality ingredients, but don’t worry, nothing too fancy. Just make sure everything’s at room temperature before you start (except the strawberries – those stay fresh and cool). Here’s exactly what you’ll need:
For the Vanilla Cake Layer
- 1 1/4 cups all-purpose flour (spooned and leveled – no packing!)
- 1 1/4 tsp baking powder (make sure it’s fresh)
- 1/4 tsp salt (I use kosher)
- 1/2 cup unsalted butter, softened (that means you can leave a fingerprint when you press it)
- 3/4 cup granulated sugar
- 2 large eggs (room temp – trust me on this)
- 1 tsp pure vanilla extract (none of that imitation stuff)
- 1/2 cup whole milk (the fat content matters here)
For the Chocolate Cake Layers
- 1 1/2 cups all-purpose flour
- 1/2 cup unsweetened cocoa powder (I prefer Dutch-processed for richer flavor)
- 1 1/2 tsp baking powder
- 1/2 tsp baking soda
- 1/4 tsp salt
- 1/2 cup unsalted butter, softened
- 1 cup granulated sugar
- 2 large eggs
- 1 tsp vanilla extract
- 3/4 cup buttermilk (no buttermilk? Add 1 tsp lemon juice to regular milk and wait 5 minutes)
- 1/2 cup hot coffee or hot water (coffee enhances the chocolate flavor beautifully)
For the Strawberry Filling
- 1 1/2 cups fresh strawberries, sliced (about 10 medium berries)
- 2 tbsp granulated sugar
- 1 tsp lemon juice (fresh squeezed if you can)
For the Pink Frosting
- 1 cup unsalted butter, softened
- 4 cups powdered sugar (sifted if it’s lumpy)
- 2 to 3 tbsp heavy cream or milk
- 1 tsp vanilla extract
- 2 to 3 tbsp strawberry puree (just blend a few berries until smooth)
- Pink food coloring (optional, but makes it extra pretty)
See? Nothing too crazy! Just good, honest ingredients that come together to make something magical. Now let’s get baking!
Equipment You’ll Need
Don’t stress – you probably have most of this stuff already! Here’s what I grab before starting:
- Three 6-inch round cake pans (or two 8-inch if that’s what you’ve got)
- Stand mixer or hand mixer (though a strong arm and whisk work in a pinch)
- Rubber spatula (for scraping every last bit of batter – waste not!)
- Measuring cups and spoons
- Parchment paper (lifesaver for easy removal)
- Wire cooling rack (essential for perfect layers)
- Offset spatula (makes frosting so much easier)
That’s it! No fancy gadgets required – just basic baking tools that help make this chocolate vanilla strawberry layer cake come together beautifully.
How to Make Chocolate Vanilla Strawberry Layer Cake
Alright, let’s dive into the fun part – making this gorgeous cake! I’ll walk you through each step so you get perfect layers every time. Just follow along and don’t worry – I’ve made all the mistakes so you don’t have to!
Step 1: Prepare the Vanilla Cake Layer
First things first – preheat that oven to 350°F (175°C). Trust me, you want it nice and hot when your batter’s ready. Now grab your smallest cake pan (we’re making one vanilla layer) and grease it up real good. I like to butter it, line the bottom with parchment paper, then butter the paper too – can’t be too careful!
In a medium bowl, whisk together your flour, baking powder, and salt. Set this aside – we’ll come back to it. Now take your softened butter (remember that fingerprint test?) and sugar and beat them together until they’re light and fluffy. This takes about 2 minutes with a mixer – you’ll know it’s ready when the color lightens up.
Add your eggs one at a time, mixing well after each. Then splash in that vanilla – the good stuff! Now here’s the trick: alternate adding your dry ingredients with the milk. Start and end with the dry stuff, mixing just until combined each time. Overmixing makes tough cake, and we want tender!
Pour this beautiful batter into your prepared pan and set it aside while we make the chocolate magic happen.
Step 2: Make the Chocolate Cake Layers
Okay, chocolate lovers – this is your moment! Grab two more pans and prepare them just like the first one. Now let’s make that rich chocolate batter.
Whisk together your flour, cocoa powder (oh that heavenly smell!), baking powder, baking soda, and salt in a big bowl. In another bowl, cream together your butter and sugar just like before – fluffy and pale. Add eggs one at a time, then vanilla.
Now alternate adding the dry ingredients with the buttermilk, just like with the vanilla batter. Here comes the secret weapon – slowly mix in that hot coffee or water. It’ll thin the batter but don’t panic! This gives us that deep chocolate flavor and moist texture. The batter will be thinner than the vanilla – that’s totally normal.
Divide this chocolate goodness evenly between your two prepared pans. Now you’ve got three pans ready to bake – one vanilla and two chocolate. Aren’t they pretty already?
Step 3: Bake and Cool the Layers
Pop all three pans in the oven together if they fit, or bake in batches if needed. They’ll need about 25-30 minutes – but start checking at 20. You’ll know they’re done when:
- The tops spring back when lightly pressed
- A toothpick comes out with just a few moist crumbs (not wet batter)
- The edges pull slightly away from the pan
Now the hard part – WAIT! Let the cakes cool in their pans for 10 minutes, then turn them out onto wire racks to cool completely. I know it’s tempting, but assembling with warm cakes is a recipe for disaster (trust me, I’ve cried over melted frosting before). Give them at least an hour – go watch an episode of your favorite show.
Step 4: Assemble the Chocolate Vanilla Strawberry Layer Cake
While the cakes cool, make your strawberry filling – just toss sliced strawberries with sugar and lemon juice. They’ll get juicy and delicious. For the frosting, beat the butter until creamy, then gradually add powdered sugar. Mix in cream, vanilla, and strawberry puree until fluffy. Add a drop of pink coloring if you want that pretty pastel look.
Now the fun part! Place one chocolate layer on your cake stand. Spread a layer of frosting, then arrange strawberry slices on top. Add the vanilla layer next – more frosting, more strawberries. Top with the final chocolate layer. Now frost the whole cake with that gorgeous pink frosting.
Here’s my pro tip: chill the cake for 20-30 minutes before slicing. This sets everything and gives you those picture-perfect clean slices. Then stand back and admire your masterpiece!
Tips for the Perfect Chocolate Vanilla Strawberry Layer Cake
Okay, let me share all my hard-earned secrets for making this cake absolutely foolproof. I’ve made every mistake possible so you don’t have to!
- Level those layers! Use a serrated knife to gently slice off any domed tops before assembling. Flat layers mean no sliding and prettier slices.
- Frosting too thick? Add cream 1 teaspoon at a time. Too thin? More powdered sugar. You want it spreadable but not runny.
- Fresh is best with strawberries – but if yours aren’t super sweet, let them macerate in the sugar longer (up to 30 minutes).
- Crumb coat magic: Do a thin layer of frosting first, chill for 15 minutes, then do the final coat. No crumbs in your pretty pink frosting!
- Room temp matters: Cold ingredients don’t mix well. Take butter, eggs, and milk out at least an hour before baking.
- Storage tip: Keep leftovers in the fridge, but let slices sit at room temp for 10 minutes before serving – the flavors really pop!
- Freezing option: Wrap unfrosted layers tightly in plastic wrap and freeze for up to 2 months. Thaw before frosting.
- No buttermilk? Make your own by adding 1 tablespoon lemon juice or vinegar to 1 cup milk. Let it sit for 5 minutes.
Remember – baking is supposed to be fun! If your layers aren’t perfectly even or your frosting isn’t bakery-smooth, who cares? It’ll still taste amazing. Some of my best cakes have been the “ugly” ones!
Variations for Your Chocolate Vanilla Strawberry Layer Cake
Oh, the fun part – making this cake your own! Here are some delicious twists I’ve tried (and loved) over the years:
- Berry swap: Out of strawberries? Raspberries or blackberries work beautifully – just adjust the sugar depending on their tartness.
- Frosting change-up: Swap the buttercream for cream cheese frosting – just beat 8 oz softened cream cheese with the butter before adding sugar. Divine!
- Chocolate lover’s dream: Add mini chocolate chips between the layers with the strawberries for extra chocolatey goodness.
- Citrus twist: Add orange zest to the vanilla batter and use orange juice instead of lemon with the strawberries – so refreshing!
- Nutty crunch: Sprinkle chopped toasted almonds or hazelnuts between layers for texture.
- Vanilla bean magic: Scrape a vanilla bean into the vanilla batter instead of extract for those gorgeous little specks.
- Boozy berries: For adults-only versions, soak the strawberries in a tablespoon of Grand Marnier or Chambord first.
The beauty of this chocolate vanilla strawberry layer cake is how adaptable it is! Once you’ve mastered the basic version, don’t be afraid to play around – some of my favorite creations came from happy accidents in the kitchen.
Serving and Storing Your Chocolate Vanilla Strawberry Layer Cake
Okay, let’s talk about the best ways to serve and keep this beauty fresh! After all that work, you want every slice to be as perfect as the first, right?
Serving tips: I always chill my assembled cake for at least 20 minutes before slicing – it makes those layers hold their shape beautifully. Use a sharp knife dipped in hot water (and wiped dry) for the cleanest cuts. And here’s my little secret – let each slice sit at room temperature for about 10 minutes before serving. The flavors really wake up and the texture becomes perfectly tender.
Storage: This cake keeps surprisingly well in the fridge thanks to all that butter in the frosting acting as a natural preservative. Just cover it loosely with plastic wrap or pop it in a cake carrier. It’ll stay fresh for up to 3 days – though in my house, it never lasts that long!
If you need to store individual slices (who are we kidding, but just in case), wrap them tightly in plastic wrap. They’ll keep for about 2 days in the fridge. The strawberries might get a bit softer, but the cake will still taste amazing.
One warning – don’t leave this cake out at room temperature for more than a couple hours, especially if it’s warm. Those fresh strawberries and dairy in the frosting mean it’s happiest staying chilled until serving time.
Nutritional Information
Okay, let’s be real – we’re not eating cake for the health benefits! But since some folks like to know, here’s the nutritional breakdown per slice (based on 12 servings). Just remember – these are estimates and will vary based on your exact ingredients and brands.
- Calories: 540
- Total Fat: 25g (15g saturated)
- Cholesterol: 95mg
- Sodium: 220mg
- Total Carbohydrates: 75g
- Dietary Fiber: 2g
- Sugars: 45g
- Protein: 6g
Now, here’s my philosophy – life’s too short to stress over cake calories! This chocolate vanilla strawberry layer cake is meant to be enjoyed at celebrations and special moments. Everything in moderation, right? Besides, those fresh strawberries count as fruit, so technically this is health food!
Disclaimer: Nutrition values are estimates only and will vary based on specific ingredients used and serving sizes. Calculations are based on standard USDA values and may differ based on product brands and preparation methods.
Frequently Asked Questions
I’ve gotten so many questions about this chocolate vanilla strawberry layer cake over the years – here are the ones that pop up most often with my tried-and-true answers!
Can I use frozen strawberries instead of fresh?
Absolutely! Just thaw them completely first and pat them very dry with paper towels – frozen berries release way more liquid. I’d skip the sugar maceration step since frozen berries are usually softer. They’ll taste slightly different but still delicious!
How can I make the frosting less sweet?
Oh, I hear you! Try these tricks: use half butter and half cream cheese, reduce the powdered sugar to 3 cups, or add a pinch of salt to balance the sweetness. The strawberry puree also helps cut the sugar taste – don’t skip it!
Can I make this cake ahead of time?
You bet! Bake the layers up to 2 days early – wrap them tightly in plastic once cooled and store at room temp. The assembled cake keeps beautifully in the fridge for a day before serving. Just add fresh strawberry slices right before serving so they don’t get mushy.
What if I don’t have three cake pans?
No worries! Bake one layer at a time, washing and reusing your pan. Just keep the unused batter at room temp while waiting – don’t refrigerate it. The baking time might need slight adjustment since you’re putting room-temp batter into a hot oven.
Why add coffee to chocolate cake?
Trust me, even if you hate coffee, you won’t taste it! The coffee just enhances the chocolate flavor – making it richer and deeper. If you’re really opposed, hot water works too, but try it with coffee once – you’ll be amazed at the difference!
Heavenly Chocolate Vanilla Strawberry Layer Cake in 5 Easy Steps
A delicious three-layer cake combining vanilla, chocolate, and fresh strawberries with pink frosting.
- Prep Time: 35 minutes
- Cook Time: 30 minutes
- Total Time: 1 hour 5 minutes
- Yield: 12 servings 1x
- Category: Dessert
- Method: Baking
- Cuisine: American
- Diet: Vegetarian
Ingredients
- For the Vanilla Cake Layer:
- 1 1/4 cups all-purpose flour
- 1 1/4 tsp baking powder
- 1/4 tsp salt
- 1/2 cup unsalted butter, softened
- 3/4 cup granulated sugar
- 2 large eggs
- 1 tsp vanilla extract
- 1/2 cup whole milk
- For the Chocolate Cake Layers:
- 1 1/2 cups all-purpose flour
- 1/2 cup unsweetened cocoa powder
- 1 1/2 tsp baking powder
- 1/2 tsp baking soda
- 1/4 tsp salt
- 1/2 cup unsalted butter, softened
- 1 cup granulated sugar
- 2 large eggs
- 1 tsp vanilla extract
- 3/4 cup buttermilk
- 1/2 cup hot coffee or hot water
- For the Strawberry Filling:
- 1 1/2 cups fresh strawberries, sliced
- 2 tbsp granulated sugar
- 1 tsp lemon juice
- For the Pink Frosting:
- 1 cup unsalted butter, softened
- 4 cups powdered sugar
- 2 to 3 tbsp heavy cream or milk
- 1 tsp vanilla extract
- 2 to 3 tbsp strawberry puree
- Pink food coloring, optional
Instructions
- Preheat your oven to 350°F. Grease and line three 6-inch round cake pans or two 8-inch pans.
- Make the vanilla cake layer. In a medium bowl, whisk together the flour, baking powder, and salt.
- In a large bowl, beat the butter and sugar until light and fluffy. Add the eggs and vanilla extract and mix well.
- Add the dry ingredients alternately with the milk, mixing just until combined. Pour the batter into one prepared pan.
- Make the chocolate cake batter. In a medium bowl, whisk together the flour, cocoa powder, baking powder, baking soda, and salt.
- In a large bowl, beat the butter and sugar until fluffy. Add the eggs and vanilla extract. Mix in the dry ingredients alternately with the buttermilk. Stir in the hot coffee or hot water until smooth.
- Divide the chocolate batter evenly between the remaining pans.
- Bake for 25 to 30 minutes, or until a toothpick inserted in the center comes out clean. Let the cake layers cool completely.
- For the strawberry filling, toss the sliced strawberries with sugar and lemon juice. Let them sit for 10 minutes.
- For the frosting, beat the butter until creamy. Gradually add the powdered sugar, then mix in the cream, vanilla extract, and strawberry puree until fluffy. Add a little pink food coloring if you want a brighter pink shade.
- Assemble the cake by placing one chocolate layer on a cake plate. Spread pink frosting over the top and add sliced strawberries.
- Add the vanilla cake layer, spread with more frosting, and top with more sliced strawberries.
- Place the final chocolate layer on top. Frost the entire cake with the pink frosting.
- Chill for 20 to 30 minutes before slicing for cleaner layers. Serve fresh.
Notes
- Use room-temperature ingredients for best results.
- Adjust frosting sweetness by adding more or less sugar.
- Store leftovers in an airtight container in the fridge.
Nutrition
- Serving Size: 1 slice
- Calories: 540
- Sugar: 45g
- Sodium: 220mg
- Fat: 25g
- Saturated Fat: 15g
- Unsaturated Fat: 8g
- Trans Fat: 0g
- Carbohydrates: 75g
- Fiber: 2g
- Protein: 6g
- Cholesterol: 95mg
Keywords: Chocolate vanilla strawberry layer cake, Pink frosted cake, Chocolate strawberry cake, Vanilla and chocolate cake, Fresh strawberry birthday cake, Homemade layer cake recipe