
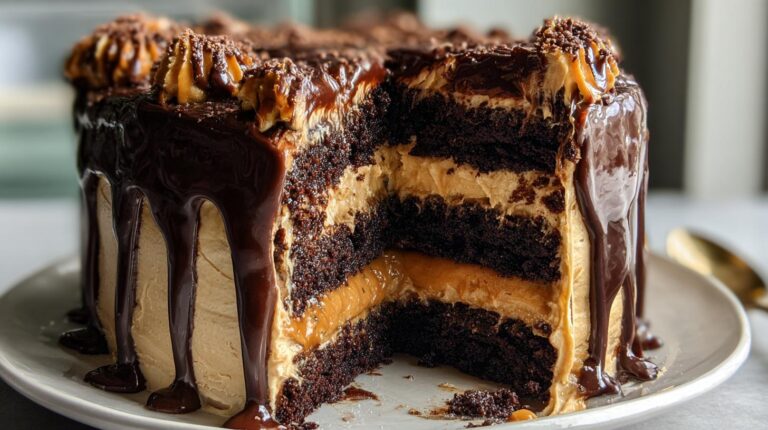
Oh my goodness, let me tell you about this chocolate peanut butter cake – it’s the stuff dreams are made of! I still remember the first time I made this beauty for my husband’s birthday. His eyes practically rolled back in his head after one bite (and yes, he immediately asked for seconds). This isn’t just any cake – it’s layers of rich, moist chocolate cake slathered with creamy peanut butter buttercream, all topped with that gorgeous chocolate ganache drip that makes it look straight from a fancy bakery.
The magic happens when the deep chocolate flavor meets that salty-sweet peanut butter frosting. It’s that perfect balance that keeps you coming back for “just one more” slice. Trust me, I’ve made this for countless birthdays, potlucks, and “just because” days, and it never fails to disappear faster than you can say “pass me another piece!”
The Good Stuff You’ll Need
Alright, let’s gather our treasures! I’ve learned over the years that quality ingredients make all the difference with this cake. Don’t skimp on the peanut butter – go for the good creamy stuff, not the natural kind that separates (trust me on this). Here’s everything you’ll need, organized so you’re not running back to the pantry mid-recipe:
For the Chocolate Cake Layers:
- 1 1/2 cups all-purpose flour (spoon and leveled, please!)
- 1 1/2 cups granulated sugar
- 3/4 cup unsweetened cocoa powder (I love Hershey’s Special Dark)
- 1 1/2 tsp baking powder
- 1 1/2 tsp baking soda
- 1 tsp kosher salt (those big flakes matter)
- 2 large eggs (room temp – takes about 30 minutes out of the fridge)
- 3/4 cup buttermilk (no buttermilk? Add 1 tbsp vinegar to regular milk)
- 1/2 cup vegetable oil (canola works too)
- 2 tsp vanilla extract (the real stuff, not imitation)
- 3/4 cup hot coffee (or hot water if you’re anti-coffee – but it really enhances the chocolate!)
For the Peanut Butter Buttercream:
- 1 1/2 cups (3 sticks) unsalted butter, softened (not melted!)
- 1 1/4 cups creamy peanut butter (Jif or Skippy works great)
- 5 cups powdered sugar (sifted if it’s lumpy)
- 2–4 tbsp heavy cream (have extra handy)
- 2 tsp vanilla extract
- 1/2 tsp kosher salt (balances the sweetness perfectly)
For That Gorgeous Ganache Drip:
- 6 oz semi-sweet chocolate, chopped (or chips – Ghirardelli is my go-to)
- 1/2 cup heavy cream
Pro tip: Measure everything before you start – it makes the baking process so much smoother. And yes, you’ll want to lick every bowl clean!
How to Make Chocolate Peanut Butter Cake
Okay, baking buddies, grab your whisks and get ready for some chocolate peanut butter magic! I’ll walk you through each step like I’m right there in your kitchen with you. Don’t let the layers intimidate you – we’re taking this one delicious step at a time.
Baking the Chocolate Cake Layers
First things first – preheat that oven to 350°F. While it’s heating up, let’s prepare our cake pans. I grease mine thoroughly with butter or baking spray, then line the bottoms with parchment rounds (trace the pan and cut circles – it’s worth the extra minute!).
Now, the dry ingredients: whisk together flour, sugar, cocoa powder, baking powder, baking soda, and salt in your largest bowl. Make sure those powders are fully incorporated – no cocoa lumps allowed! Then add your eggs (remember, room temp!), buttermilk, oil, and vanilla. Whisk until it looks smooth and gorgeous.
Here comes the secret weapon: slowly whisk in that hot coffee. The batter will be thin – that’s perfect! Divide it evenly between your pans (I use a kitchen scale for precision). Bake for 28-32 minutes until a toothpick comes out with just a few moist crumbs clinging to it – don’t overbake!
Let the cakes cool in pans for 10 minutes exactly (sets the structure), then turn them out onto racks to cool completely. No shortcuts here – warm cakes make melty frosting disasters!
Making the Peanut Butter Buttercream
While cakes cool, let’s make that dreamy peanut butter buttercream. Start with butter that’s softened (you should be able to press it easily with a finger but it shouldn’t be greasy). Beat it with peanut butter until creamy – about 2-3 minutes.
Gradually add powdered sugar (unless you want a sugar storm in your kitchen!). Once incorporated, add vanilla and salt. Now comes the magic – drizzle in heavy cream 1 tablespoon at a time until it’s fluffy and spreadable. The texture should be like perfect cloud pillows!
Pro tip: If it’s too thick, add cream teaspoon by teaspoon. Too thin? More powdered sugar. Taste as you go – I won’t tell!
Assembling and Decorating the Cake
Time for the fun part! If your cakes domed, level them gently with a serrated knife. Place your first layer on a cake stand or plate, then slather on a generous amount of peanut butter buttercream. Repeat with remaining layers.
Now apply a thin crumb coat – just enough frosting to seal in crumbs – and pop it in the fridge for 15 minutes. This step feels like an eternity but makes all the difference!
For the ganache: heat cream until steaming (not boiling), pour over chocolate, let sit 2 minutes, then whisk until glossy. Wait 5-10 minutes until it coats a spoon thickly but still drips slowly.
Drip technique: Spoon or pipe ganache around the edges, letting it cascade down naturally. Fill the top center and smooth gently. Add buttercream dollops if you’re feeling fancy! Chill 10-15 minutes to set before slicing.
Warning: This cake disappears fast – guard your slice!
Tips for the Perfect Chocolate Peanut Butter Cake
After making this cake more times than I can count (and licking more spoons than I care to admit), I’ve picked up some foolproof tricks to guarantee bakery-worthy results every time. These are the little things that take your cake from “good” to “OH MY GOSH WHERE HAS THIS BEEN ALL MY LIFE?”
Choose your cocoa powder wisely
Not all cocoa powders are created equal! I swear by Hershey’s Special Dark for its rich, deep chocolate flavor – it makes the cake taste like it came from a fancy chocolatier. Regular cocoa works too, but splurge on the good stuff if you can. And whatever you do, don’t use hot chocolate mix (yes, I learned that lesson the hard way).
The ganache drip dance
Getting those perfect drips is all about timing and temperature. Here’s my method: test the ganache on the side of your mixing bowl first. If it runs right off, it’s too thin – let it cool another minute or two. Want thicker, slower drips? Wait until it coats the back of a spoon thickly. And always do a test drip on the back of the cake before committing!
Chill out between steps
I know, I know – waiting is the worst part. But trust me, chilling the cake for 15 minutes after the crumb coat makes frosting so much easier. And letting those cake layers cool completely? Non-negotiable unless you want a melty mess. Stick them in the fridge if you’re impatient (like me).
Peanut butter matters
Skip the natural peanut butter for this one – the oil separation makes the frosting weepy. Creamy commercial brands like Jif or Skippy give that perfect smooth texture and consistent flavor. And if you’re feeling fancy, try adding a pinch of flaky sea salt to the frosting – it balances the sweetness beautifully.
Coffee is your secret weapon
Even if you hate coffee (like my sister), use it in the cake batter! The coffee enhances the chocolate flavor without making it taste like coffee – promise. If you’re really opposed, hot water works, but you’ll miss that extra depth of flavor.
Remember – baking should be fun! If your drips aren’t perfect or your layers tilt a bit, it’ll still taste incredible. The best cakes have character!
Common Questions About Chocolate Peanut Butter Cake
I get so many questions about this cake whenever I make it (usually while people are shoveling forkfuls into their mouths)! Here are the answers to everything you might wonder – from substitutions to troubleshooting that tricky ganache drip.
Can I use natural peanut butter in the frosting?
Oh honey, I learned this lesson the hard way! Natural peanut butter tends to separate and makes the frosting weepy and greasy. Stick with creamy commercial brands like Jif or Skippy – their consistency is perfect for that dreamy peanut butter buttercream. If you must use natural, drain off excess oil first and add extra powdered sugar to stabilize it.
Help! My ganache is too runny/thick – how do I fix it?
Don’t panic! Runny ganache? Let it sit at room temperature for 5-10 more minutes – it thickens as it cools. Too thick? Microwave in 5-second bursts or add a teaspoon of warm cream. The perfect drip consistency coats the back of a spoon but still flows slowly. Pro tip: Always test a drip on the back of the cake first!
Can I make this chocolate peanut butter cake ahead?
Absolutely! The cake layers actually taste better after resting overnight (shh, it’s our little secret). Bake them a day ahead, wrap tightly in plastic, and store at room temp. Frosting can be made 2 days ahead – just rewhip it before using. Assembled cake keeps beautifully in the fridge for 3 days – just bring to room temp before serving for that perfect bakery-style texture.
What if I don’t have coffee? Can I skip it?
You can use hot water instead, but the coffee really makes the chocolate flavor sing (without tasting like coffee, promise!). If you’re caffeine-sensitive, try decaf – the flavor enhancement still works. My sister swore she hated coffee until she tried this cake – now she’s a convert!
Why did my cake layers sink in the middle?
Oh no! Usually this means either: 1) Your baking powder/soda is old (check expiration dates!), 2) You opened the oven door too early (wait at least 20 minutes!), or 3) The batter was overmixed after adding flour. Don’t worry – sunken layers still taste amazing when buried under all that peanut butter buttercream!
Got more questions? Ask away in the comments – I’ve probably made every mistake possible with this cake so I can help troubleshoot anything!
Nutritional Information
Okay, let’s be real – we’re not eating chocolate peanut butter cake for its health benefits! But if you’re curious (or need to justify that second slice), here’s the nutritional breakdown per serving. Remember, these are estimates – actual numbers can vary based on your specific ingredients and how generous you are with that peanut butter frosting!
- Serving Size: 1 slice (about 1/12 of the cake)
- Calories: 620 (worth every single one!)
- Sugar: 50g (it’s a celebration, okay?)
- Sodium: 400mg
- Fat: 35g (12g unsaturated, 15g saturated)
- Carbohydrates: 70g
- Fiber: 4g (thanks, cocoa powder!)
- Protein: 9g (peanut butter power!)
- Cholesterol: 80mg
Pro tip: If you’re watching portions, cut thinner slices… or just embrace the indulgence and enjoy every decadent bite! Life’s too short to skip dessert.
Serving and Storing Chocolate Peanut Butter Cake
Okay, let’s talk about the best ways to serve and keep this beauty fresh! First rule: always let the cake come to room temperature before serving – about 30 minutes out of the fridge. That peanut butter buttercream gets its perfect creamy texture when it’s not ice cold, and the chocolate flavors really shine.
Now, storing leftovers (if you somehow have any!):
- Counter: Fine for a few hours if your kitchen isn’t too warm
- Fridge: Up to 3 days – loosely cover with a cake dome or overturned bowl (never airtight or the frosting gets sticky!)
- Freezer: Individual slices wrapped tightly in plastic then foil last 3 months – thaw overnight in fridge
Pro tip: That ganache drip stays prettiest when stored uncovered in the fridge – just pop a paper towel over the top to prevent drying. And whatever you do, don’t microwave cold slices! The frosting melts into a puddle. Instead, let them sit on the counter until they’re perfect for eating.
Fun fact: The flavors actually get better after a day as everything melds together. So if you can resist, make it a day ahead – your patience will be rewarded!
Did You Make This Recipe?
Okay, spill the beans – did you try this chocolate peanut butter cake yet? I’m dying to hear how it turned out! Drop a comment below and tell me everything – did those drips work perfectly? Did your family go nuts for the peanut butter frosting? Snap a photo of your masterpiece (or even the messy “in progress” shots – we’ve all been there!) and tag me so I can cheer you on.
And hey, if you ran into any trouble or made any brilliant tweaks, share those too! Your tips might help another baker avoid disaster (or discover their new favorite variation). I read every single comment – promise!
Now go forth and bake something amazing. And remember – even if your cake isn’t picture-perfect, it’ll still taste incredible. That’s the magic of chocolate and peanut butter!
PrintIrresistible Chocolate Peanut Butter Cake Recipe with 3 Layers
A rich and decadent chocolate peanut butter cake featuring moist chocolate layers, creamy peanut butter buttercream, and a glossy chocolate ganache drip.
- Prep Time: 45 minutes
- Cook Time: 30 minutes
- Total Time: 1 hour 45 minutes
- Yield: 12 servings 1x
- Category: Dessert
- Method: Baking
- Cuisine: American
- Diet: Vegetarian
Ingredients
- 1 1/2 cups all-purpose flour
- 1 1/2 cups granulated sugar
- 3/4 cup unsweetened cocoa powder
- 1 1/2 tsp baking powder
- 1 1/2 tsp baking soda
- 1 tsp kosher salt
- 2 large eggs
- 3/4 cup buttermilk
- 1/2 cup vegetable oil
- 2 tsp vanilla extract
- 3/4 cup hot coffee (or hot water)
- 1 1/2 cups (3 sticks) unsalted butter, softened
- 1 1/4 cups creamy peanut butter
- 5 cups powdered sugar
- 2–4 tbsp heavy cream (as needed)
- 2 tsp vanilla extract
- 1/2 tsp kosher salt
- 6 oz semi-sweet chocolate, chopped (or chips)
- 1/2 cup heavy cream
Instructions
- Preheat oven to 350°F. Grease and line three 6-inch cake pans with parchment rounds.
- In a large bowl, whisk flour, sugar, cocoa, baking powder, baking soda, and salt.
- Whisk in eggs, buttermilk, oil, and vanilla until smooth.
- Slowly whisk in hot coffee (batter will be thin).
- Divide batter evenly among pans. Bake 28–32 minutes, or until a toothpick comes out with a few moist crumbs.
- Cool in pans 10 minutes, then turn out onto a rack to cool completely.
- Beat butter and peanut butter until creamy (2–3 minutes). Add powdered sugar gradually, then vanilla and salt. Beat in heavy cream 1 tbsp at a time until fluffy and spreadable.
- Level cake layers if needed. Stack with a thick layer of peanut butter buttercream between each layer. Crumb coat the cake, chill 15 minutes, then frost smoothly.
- Heat cream until steaming (not boiling). Pour over chocolate, rest 2 minutes, then whisk until glossy. Cool 5–10 minutes until drip consistency.
- Spoon or pipe ganache around the rim for drips, then cover the top. Pipe peanut butter buttercream dollops around the sides/top if desired. Chill 10–15 minutes to set before slicing.
Notes
- Use high-quality cocoa powder for the best chocolate flavor.
- Ensure all cake ingredients are at room temperature for even mixing.
- Adjust ganache thickness by cooling longer for thicker drips or using it warm for thinner ones.
Nutrition
- Serving Size: 1 slice
- Calories: 620
- Sugar: 50g
- Sodium: 400mg
- Fat: 35g
- Saturated Fat: 15g
- Unsaturated Fat: 12g
- Trans Fat: 0g
- Carbohydrates: 70g
- Fiber: 4g
- Protein: 9g
- Cholesterol: 80mg
Keywords: chocolate peanut butter cake, chocolate ganache drip cake, peanut butter buttercream frosting, layered chocolate cake recipe, bakery-style drip cake, peanut butter chocolate dessert