
Picture this: It’s 6 PM, the kids are hangry, and you’re staring into the fridge praying for dinner inspiration. That’s when these crispy cheesy beef burritos swoop in to save the day! I’ve lost count of how many chaotic weeknights this recipe has rescued me from—just last Tuesday, my toddler was clinging to my leg while I whipped these up in record time. The magic? That golden, crunchy tortilla hugging melted cheese and perfectly seasoned beef—it’s what dreams are made of! Trust me, once you hear that satisfying crunch of your first bite, you’ll understand why this is my go-to “hero dinner” for busy nights.
Why You’ll Love These Crispy Cheesy Beef Burritos
Listen, I know you’ve got a million recipes vying for your attention, but let me tell you why these burritos deserve a permanent spot in your dinner rotation:
- 30-minute magic: From fridge to plate faster than you can say “takeout.” Seriously, my record is 27 minutes flat—and that includes the time it took to fish a rogue crayon out of the dog’s mouth.
- That irresistible crunch: We’re talking golden-brown tortillas with just the right amount of crispy edges hugging all that cheesy goodness. It’s the kind of texture that makes you close your eyes and go “mmmm.”
- Cheese pull perfection: The cheddar-mozzarella combo melts into the beef like a warm hug. Pro tip: Let them sit for exactly 47 seconds after toasting—that’s the sweet spot for maximum stretch.
- Kid-approved (and husband-proof): My picky six-year-old calls these “crispy cheese tacos” and inhales them. Even my meat-and-potatoes dad asks for seconds—and that’s saying something!
Honestly? The biggest problem you’ll have is keeping extras around for lunch the next day. (Spoiler: They never last that long.)
Ingredients for Crispy Cheesy Beef Burritos
Gather these simple ingredients—I promise you probably have half of them in your kitchen right now! The beauty of this recipe is how ordinary ingredients transform into something extraordinary when they meet that hot skillet.
- 1 pound ground beef (80/20 works best for flavor, but leaner works too)
- 1 tablespoon olive oil (for that perfect sauté)
- 1/2 cup diced onion (yellow or white—I’m not picky!)
- 2 cloves garlic, minced (fresh is best, but 1/2 tsp jarred works in a pinch)
- 1 teaspoon chili powder (the backbone of our spice blend)
- 1 teaspoon ground cumin (that warm, earthy note)
- 1/2 teaspoon smoked paprika (trust me, this makes all the difference)
- 1/2 teaspoon salt (plus more to taste)
- 1/4 teaspoon black pepper (freshly ground if you’re fancy)
- 1/2 cup tomato sauce (not marinara—just plain old tomato sauce)
- 1 cup shredded cheddar cheese (sharp is my favorite for bold flavor)
- 1 cup shredded mozzarella cheese (for that glorious melt factor)
- 1/4 cup sour cream (the creamy secret weapon)
- 4 large flour tortillas (burrito-size, about 10-inch diameter)
- 2 tablespoons butter (for that golden crispiness—no substitutes here!)
- 1 tablespoon chopped fresh parsley (optional, but pretty)
Ingredient Notes & Substitutions
Life happens, and sometimes you’ve got to improvise! Here’s how to adapt without losing that crispy-cheesy magic:
- Ground turkey or chicken works instead of beef—just add an extra tablespoon of olive oil since they’re leaner.
- Out of sour cream? Plain Greek yogurt makes a great tangy substitute.
- For gluten-free friends, corn tortillas work (though they won’t get quite as crispy). Warm them first so they don’t crack when rolling.
- Cheese snobs unite! While pre-shredded works, freshly grated cheese melts smoother. But between us? I’ve used bagged shreds many times when desperate.
- Spice level too mild? Add diced jalapeños to the beef mix or a dash of cayenne to the spices.
The only non-negotiable? That butter for toasting. Margarine just doesn’t give the same golden crunch—learned that the hard way during the Great Butter Shortage of 2020!
How to Make Crispy Cheesy Beef Burritos
Okay, let’s get cooking! I promise this is easier than folding a fitted sheet—just follow these steps and you’ll be biting into crispy-cheesy perfection in no time.
- Brown that beef: Heat olive oil in your trusty skillet over medium heat. Toss in the diced onion and let it soften for 2-3 minutes until it’s just starting to turn translucent. Now add the garlic (your kitchen should smell amazing by this point) and the ground beef. Break it up with your spoon like you’re playing whack-a-mole until no pink remains—about 5 minutes.
- Spice it up: Sprinkle in all those gorgeous spices—chili powder, cumin, smoked paprika, salt, and pepper. Stir like you mean it to coat every bit of meat. Now pour in the tomato sauce and let everything simmer together for another 2-3 minutes until thickened. Remove from heat and let it cool slightly (hot filling = torn tortillas = sad chef).
- Assembly line time: Lay out your tortillas and spread about a tablespoon of sour cream in the center of each. Spoon that glorious beef mixture on top, then shower with both cheeses—don’t be shy here! Leave about a 1-inch border around the edges.
- Roll like a pro: Fold in the sides first (this keeps all that cheesy goodness from escaping), then roll up tightly starting from the bottom. Imagine you’re wrapping a tiny burrito baby—secure but not suffocating!
- Crispy magic: Melt butter in your skillet over medium heat. Place burritos seam-side down first—this seals them shut. Cook for 2-3 minutes per side until they’re golden brown and make that satisfying sizzle sound. Flip carefully with a spatula (they’re hot and fragile at this stage!).
And voila! You’ve just created weeknight dinner royalty. Let them rest for a minute before slicing—I know it’s hard, but patience rewards you with better cheese distribution!
Tips for Perfect Crispy Cheesy Beef Burritos
After burning, dropping, and overfilling more burritos than I’d like to admit, here are my hard-earned secrets:
- Drain that beef: After browning, pat the meat mixture with a paper towel to remove excess grease. Soggy tortillas are the enemy of crispiness!
- Medium heat is key: Too high and you’ll burn the tortilla before the cheese melts. Too low and you’ll end up with floppy sadness. Look for that gentle butter bubble when testing pan temperature.
- Seal the deal: Press gently with your spatula after the first flip—this helps fuse the seam shut and prevents catastrophic cheese leaks. Learned this after my toddler found molten cheddar on the floor…
Serving Suggestions for Crispy Cheesy Beef Burritos
Now, let’s talk about turning these crispy beauties into a full meal! I’ve served these burritos every which way—from “I’m too tired to care” paper-plate dinners to “Mom actually tried” presentations. Here’s what always works:
- Classic Mexican trio: A scoop of cilantro-lime rice (the kind that comes in a pouch when you’re being honest about your energy levels), refried beans dashed with hot sauce, and a big dollop of guacamole. Bonus points if you serve it all on one of those colorful plastic plates you stole from your mom.
- The crunch contrast: A simple cabbage slaw with lime juice and a pinch of salt cuts through the richness perfectly. My lazy version? Bagged coleslaw mix + bottled lime vinaigrette shaken together in the bag—no dishes!
- Dip it good: Warm queso for dunking (because more cheese is always the answer), or cool salsa verde if you want that tangy contrast. My kids think it’s fancy when I put dipping sauces in little ramekins—shhh, don’t tell them it’s just to contain the mess.
- Breakfast for dinner: Serve with fried eggs on top—the runny yolks turn these into next-level goodness. Did this once during a fridge-cleaning crisis and now it’s a monthly request!
Honestly? Sometimes I just plop them on a cutting board with ▪️▪️▪️▪️▪️▪️nch of sour cream and call it dinner. No judgment here—we’re all just trying to feed people without losing our minds!
Storage & Reheating Instructions
Okay, confession time: There’s rarely leftovers when I make these crispy cheesy beef burritos—but on the off chance you’ve got some, here’s how to keep them tasting amazing! Just last week I forgot one in the fridge and rediscovered it three days later… still delicious after my magic revival tricks.
Fridge Storage (Up to 3 Days)
First things first—let those burritos cool completely before storing (hot burritos = condensation = soggy tortilla disaster). I learned this the hard way after ruining a whole batch by wrapping them too soon. Now I let them sit on the counter for about 15 minutes while we eat.
- Wrap individually: Each burrito gets its own snug foil hug—this keeps the crispy exterior from getting soft. No foil? Parchment paper works too.
- Airtight container: Stack your foil-wrapped treasures in a container with the lid slightly vented for the first hour to prevent steam buildup.
Reheating Like a Pro
Now, the million-dollar question: How to recapture that glorious crispiness? I’ve tested every method imaginable—here’s what actually works:
- Skillet method (best for crispiness): Unwrap your burrito and heat a dry skillet over medium-low. Toast for 2-3 minutes per side—no butter needed since the original butter flavor is still there. This works SO well I sometimes prefer it to fresh!
- Oven revival (for multiple burritos): 350°F on a baking sheet for 10 minutes, flipping halfway. Pro tip: Spritz lightly with water before baking to prevent drying out.
- Microwave emergency (with precautions): If you MUST microwave, unwrap completely and wrap in a dry paper towel first. Nuke for 30 seconds, flip, then another 15 seconds. It won’t be crispy, but the cheese will at least be melty again!
Warning: Microwaving without the paper towel trick turns your beautiful burrito into a sad, soggy mess—trust me, we’ve all been there after that late-night snack attack!
Freezing for Future You
Yes! These freeze beautifully for up to 3 months—my freezer always has a couple stashed for “I can’t even” nights.
- Wrap tightly in foil, then place in freezer bags (squeeze out excess air).
- To reheat from frozen: Bake at 375°F for 20-25 minutes, flipping halfway. No thawing needed!
See? Now you’ve got no excuse not to make a double batch—future exhausted-you will be SO grateful!
Crispy Cheesy Beef Burritos FAQs
After making these burritos approximately 8,742 times (okay maybe just weekly for five years), I’ve fielded every question imaginable. Here are the answers to the ones that pop up most often—consider this your crispy-cheesy troubleshooting guide!
Can I freeze these crispy beef burritos?
Absolutely! These freeze like champs—just wrap each cooled burrito tightly in foil and pop them in a freezer bag. They’ll keep for up to 3 months. When hunger strikes, bake frozen burritos at 375°F for 20-25 minutes (no thawing needed!). My freezer always has a few stashed for emergency dinners—they’ve saved me during power outages, surprise guests, and that one time I forgot it was my turn to bring snacks for soccer.
How do I prevent burrito bursting disasters?
Ah, the dreaded cheese volcano! Three golden rules: 1) Don’t overstuff—leave about an inch border when filling. 2) Fold sides in first like you’re making an envelope before rolling. 3) Start seam-side down in the pan to seal it shut. If you see filling trying to escape during cooking, gently press with your spatula to reseal. Pro tip: If disaster strikes, just call it a “deconstructed burrito bowl” and pretend you meant to do that!
Can I use pre-shredded cheese?
Listen, I won’t judge—I’ve used those bags more times than I can count! Pre-shredded works in a pinch, but freshly grated cheese melts smoother because it doesn’t have that anti-caking powder. Here’s my compromise: use pre-shredded for speed, but let the filling sit for a minute after mixing so the cheese can soften before rolling. Bonus: The starch coating on pre-shredded actually helps absorb excess moisture from the beef!
Why didn’t my burritos get crispy?
Oh honey, we’ve all been there—probably one of three issues: 1) Pan wasn’t hot enough (wait for butter to bubble when testing temp). 2) Filling was too wet (always pat that beef dry!). 3) You crowded the pan (give each burrito breathing room). If your first batch comes out soft, crank the heat slightly for round two and extend cooking time by 30 seconds per side. And remember—even slightly limp burritos still taste amazing!
Can I make these vegetarian?
You bet! Swap the beef for black beans (drained well!) or meatless crumbles. My vegetarian sister adds roasted sweet potatoes and dramtically calls it her “Southwestern sunset burrito.” Just keep the filling dry—vegetarian versions tend to release more moisture, so I often add a tablespoon of breadcrumbs to absorb excess liquid before rolling.
Nutritional Information
Now let’s talk numbers—because I know some of you are curious (or just want to justify eating two!). These crispy cheesy beef burritos pack serious flavor without going totally off the rails nutritionally. Just remember: Nutritional values are estimates and vary based on ingredients used. My numbers are based on 80/20 beef and regular flour tortillas—your mileage may vary!
Per Serving (1 burrito):
- Calories: 520 (but totally worth every one!)
- Fat: 32g (14g saturated – that’s the cheese & butter working their magic)
- Protein: 30g (hello, beef and cheese power duo)
- Carbohydrates: 28g (2g fiber – tortillas count for most of this)
- Sugar: 3g (Teaching moment: That’s from the tomato sauce!)
- Sodium: 780mg (Want to reduce? Use low-sodium tomato sauce)
Now, before anyone panics about the fat content—remember this is a complete meal in one handy package! Pair it with a big salad or veggie side and you’ve got balance. My nutritionist friend always says “It’s not about one meal, it’s about patterns”—so enjoy your crispy-cheesy heaven guilt-free!
Did You Make This Recipe?
Okay my crispy-cheesy friend, confession time—I LIVE for seeing your kitchen creations! Did these burritos save your weeknight like they’ve saved mine? Drop me a comment below and tell me all about it—did you add extra cheese (you rebel)? Did your kids actually eat them without complaining (miracle!)? I read every single one while drinking my morning coffee—it’s my favorite part of running this blog!
Better yet, snap a pic of your golden-brown masterpieces and tag me on Instagram @CrispyCheesyQueen—I’ll feature my favorites in stories! Pro tip: Get that cheese-pull shot by lifting your burrito slowly with a fork right after cutting. Bonus points if you capture your kid’s face mid-bite (those messy-cheese smiles kill me every time!).
And if you’re feeling extra generous? Leave a star rating! Those little stars help more busy cooks find this recipe when they’re desperately googling “quick dinner ideas” at 5:47 PM. Now go forth and enjoy your crispy-cheesy victory—you’ve earned it!
PrintCrispy Cheesy Beef Burritos: Your 30-Minute Dinner Savior

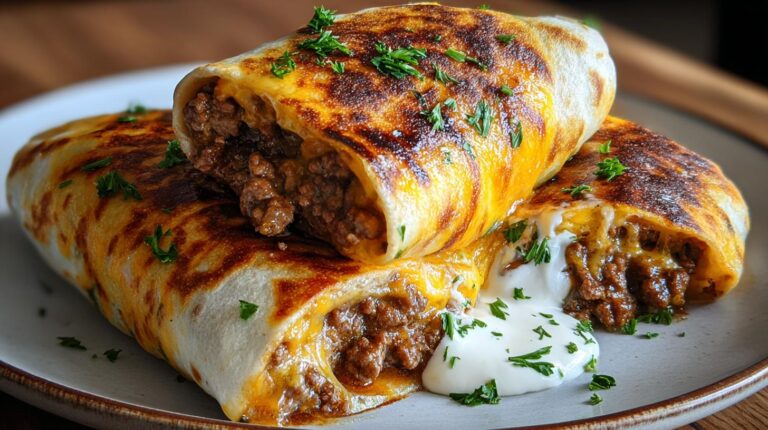
Crispy cheesy beef burritos filled with seasoned ground beef, melted cheese, and a touch of sour cream, toasted to perfection.
- Prep Time: 15 minutes
- Cook Time: 15 minutes
- Total Time: 30 minutes
- Yield: 4 servings 1x
- Category: Dinner
- Method: Stovetop
- Cuisine: Mexican
- Diet: Halal
Ingredients
- 1 pound ground beef
- 1 tablespoon olive oil
- 1/2 cup diced onion
- 2 cloves garlic, minced
- 1 teaspoon chili powder
- 1 teaspoon ground cumin
- 1/2 teaspoon smoked paprika
- 1/2 teaspoon salt
- 1/4 teaspoon black pepper
- 1/2 cup tomato sauce
- 1 cup shredded cheddar cheese
- 1 cup shredded mozzarella cheese
- 1/4 cup sour cream
- 4 large flour tortillas
- 2 tablespoons butter, for toasting
- 1 tablespoon chopped fresh parsley, for garnish
Instructions
- Heat olive oil in a large skillet over medium heat. Add diced onion and cook for 2 to 3 minutes until softened.
- Add garlic and ground beef. Cook until the beef is browned and fully cooked, breaking it up with a spoon as it cooks.
- Stir in chili powder, cumin, smoked paprika, salt, and black pepper.
- Pour in tomato sauce and cook for 2 to 3 minutes until the mixture is thick and well combined.
- Remove from heat and let the beef mixture cool slightly.
- Lay the flour tortillas on a flat surface. Spread a small spoonful of sour cream in the center of each tortilla.
- Add the beef mixture, then top with cheddar cheese and mozzarella cheese.
- Fold in the sides and roll each tortilla tightly into a burrito.
- Melt butter in a skillet over medium heat. Place the burritos seam-side down and cook for 2 to 3 minutes per side until golden brown and crispy.
- Remove from the skillet, garnish with chopped parsley, and serve warm.
Notes
- For a spicier kick, add diced jalapeños to the beef mixture.
- Use whole wheat tortillas for a healthier option.
- Store leftovers in an airtight container in the fridge for up to 3 days.
Nutrition
- Serving Size: 1 burrito
- Calories: 520
- Sugar: 3g
- Sodium: 780mg
- Fat: 32g
- Saturated Fat: 14g
- Unsaturated Fat: 12g
- Trans Fat: 1g
- Carbohydrates: 28g
- Fiber: 2g
- Protein: 30g
- Cholesterol: 95mg
Keywords: crispy cheesy beef burritos, easy beef burritos, cheesy burrito recipe, skillet burritos, tortilla wrap dinner, weeknight beef dinner